Reduxing Flutter Firebase App – WeightTracker 4
In this post I’m going to go through how I added flutter_redux library to my existing Firebase-connected app. The presented development is part of my Weight Tracker app (simple app for tracking weight) and will be focused only on that.
Note*:** This is only my approach to this problem. There are probably better ones. 😉*
Introduction
Some time ago I came across Redux library which provides a way to have one state object (not in the meaning of Flutter state) in the application and pass it to widgets in build functions. I recommend going to example to make sure you understand the concept. I didn’t think that I need this kind of tool until I started playing with Firebase Auth and user switching. For me having Database reference in a view class and making sure that it corresponds to the right user and has attached right listeners didn’t work out. Especially having in mind that soon I want to add more Widgets. So I decided to make use of Redux and see if it solves my problems.
Note: I mentioned user switching but it won’t be in the content of this post since it is still in development.
Getting started
Dependencies
First of all, I added Redux dependencies in your pubspec.yaml (as on 05-10-2017):
dependencies: flutter: sdk: flutter ... redux: ">=2.0.0 <3.0.0" flutter_redux: 0.3.1State and reducer
Next step is to create state class which will represent the whole state in my application and stateReducer method for manipulating state. At this point, I will have only the list of weights. So created redux_core.dart file looks like this:
import 'package:weight_tracker/model/weight_entry.dart';
@immutableclass ReduxState {  final List<WeightEntry> entries;
  ReduxState({this.entries});
  ReduxState copyWith({List<WeightEntry> entries}) {    return new ReduxState(      entries: entries ?? this.entries,      );  }}
ReduxState stateReducer(ReduxState state, action) {  //TODO: add actions  return state;}
Interesting thing here is that action is dynamic. Since there will be different types of actions that will provide various types of data, Brian Egan suggested to have a class for every action and don’t play with generic Action class. And that’s what I did 🙂
What is also worth mentioning is that ReduxState class is immutable. That means that in order to “change” state, we have to create a new one. That’s why I created copyWith method, so it will be easy to copy state with only changed fields.
Store and StoreProvider
In main.dart I create a Store object and provide it in StoreProvider. From now on every StoreConnector will have access to the store and therefore to the state.
import 'package:flutter/material.dart';import 'package:flutter_redux/flutter_redux.dart';import 'package:redux/redux.dart';import 'package:weight_tracker/home_page.dart';import 'package:weight_tracker/logic/redux_core.dart';
void main() {  runApp(new MyApp());}
class MyApp extends StatelessWidget {  final Store store = new Store(stateReducer, initialState: new ReduxState(entries: new List()));
  @override  Widget build(BuildContext context) {    return new MaterialApp(      title: 'Weight Tracker',      theme: new ThemeData(        primarySwatch: Colors.green,      ),      home: new StoreProvider(        store: store,        child: new HomePage(title: 'Weight Tracker'),      ),    );  }}
StoreConnector
Next step is to create ViewModel class in my screen widget. At this moment we don’t really need it but it will be helpful in the future.
@immutableclass HomePageViewModel {  final List<WeightEntry> entries;
  HomePageViewModel({this.entries});}
Now I will wrap my screen Widget in StoreConnector. Let’s see how it looks like:
@overrideWidget build(BuildContext context) { return new StoreConnector<ReduxState, HomePageViewModel>( converter: (store) { return new HomePageViewModel( entries: store.state.entries); }, builder: (context, viewModel) { return new Scaffold( appBar: new AppBar( title: new Text(widget.title), ), body: new ListView.builder( shrinkWrap: true, controller: _listViewScrollController, itemCount: viewModel.entries.length, itemBuilder: (buildContext, index) { //calculating difference double difference = index == viewModel.entries.length - 1 ? 0.0 : viewModel.entries[index].weight - viewModel.entries[index + 1].weight; return new InkWell( onTap: () => _openEditEntryDialog( viewModel.entries[index]), child: new WeightListItem(viewModel.entries[index], difference)); }, ), floatingActionButton: new FloatingActionButton( onPressed: () => _openAddEntryDialog(), tooltip: 'Add new weight entry', child: new Icon(Icons.add), ), ); }, );}We can see that the main Widget is now StoreConnector. It contains two components: converter and builder. A converter is a method that accepts Store and returns ViewModel specified in StoreConnector. At this point theoretically, I could use List as ViewModel since I am not using anything else but it will change soon. Another component of StoreConnector is builder, which is also a method. It is very similar to override build method except it has also earlier defined ViewModel as a parameter. We can use that ViewModel to populate data into our view.
After changing ListView.Builder to use data from viewModel we have perfectly working ListView with data coming from our state. The only problem is we have no entries there. Let’s add some!
Adding action
So far our reducer method, which is our way to mutate state, is empty. In order to make it work, we need to define Actions, which we can consider as a contract of how the state can be changed. So let’s introduce adding action:
class AddEntryAction { final WeightEntry weightEntry; AddEntryAction(this.weightEntry);}ReduxState stateReducer(ReduxState state, action) { if (action is AddEntryAction) { return new state.copyWith( entries: <WeightEntry>[] ..addAll(state.entries) ..add(action.weightEntry)); } return state;}Simple like that! Now we only need to call it. First, I will add new field in ViewModel class:
@immutableclass HomePageViewModel {  final List<WeightEntry> entries;  final Function(WeightEntry) addEntryCallback;
  HomePageViewModel({this.entries,      this.addEntryCallback});}
Then we need to update build method:
@overrideWidget build(BuildContext context) { return new StoreConnector<ReduxState, HomePageViewModel>( converter: (store) { return new HomePageViewModel( entries: store.state.entries, addEntryCallback: ((entry) => store.dispatch(new AddEntryAction(entry)))); }, builder: (context, viewModel) { return new Scaffold( ... floatingActionButton: new FloatingActionButton( onPressed: () => _openAddEntryDialog(viewModel.addEntryCallback), tooltip: 'Add new weight entry', child: new Icon(Icons.add), ), ); }, );}_openAddEntryDialog(Function(WeightEntry) onSubmittedCallback) async { WeightEntry entry = ...create entry... if (entry != null) { onSubmittedCallback(entry); }}There are a few things worth mentioning here:
- To perform an action we call the dispatch method of Store object with Action we would like to use. This will cause the reducer method to be invoked and do what we want to do.
- We can pass our method accepting entry further and call it exactly when we want it.
- This solution shows us very clearly what data our screen widget uses and what actions it can perform.
Now let’s introduce Firebase Database to the equation.
Reduxing Firebase Database
Signing in
In my scenario, I want the user to be anonymously logged in as soon as app launches. To do that we will need to do the following changes:
Add new actions
class InitAction {}class UserLoadedAction { final FirebaseUser firebaseUser; UserLoadedAction(this.firebaseUser);}Updated ReduxState
class ReduxState { final FirebaseUser firebaseUser; final List<WeightEntry> entries; ...}Since the reducer is not supposed to do any API calls, we will introduce Middleware. Middleware is a function that is invoked before reducer in order to call async functions, so that reducer will perform only pure functions without any side effects. To understand this concept better, I recommend reading this article.
firebaseMiddleware(Store<ReduxState> store, action, NextDispatcher next) { if (action is InitAction) { if (store.state.firebaseUser == null) { FirebaseAuth.instance.currentUser().then((user) { if (user != null) { store.dispatch(new UserLoadedAction(user)); } else { FirebaseAuth.instance .signInAnonymously() .then((user) => store.dispatch(new UserLoadedAction(user))); } }); } } next(action);}What happens here is if we try to dispatch InitAction, then middleware function will try to get the current user and if there is none it will try to signInAnonymously. What’s important is that this is done async, so the reducer will be invoked anyway (thanks to calling next method). When the user is provided, we dispatch new UserLoadedAction with obtained FirebaseUser.
Then let’s update stateReducer method
ReduxState stateReducer(ReduxState state, action) { if (action is UserLoadedAction) { return state.copyWith(firebaseUser: action.firebaseUser); } else if (action is AddEntryAction) { ... } return state;}And call it from widget:
class MyApp extends StatelessWidget {  final Store store = new Store(stateReducer,    initialState: new ReduxState(      firebaseUser: null,      entries: new List()),    middleware: [firebaseMiddleware].toList());
  @override  Widget build(BuildContext context) {    store.dispatch(new InitAction());    return new MaterialApp(      title: 'Weight Tracker',      theme: new ThemeData(        primarySwatch: Colors.green,      ),      home: new StoreProvider(        store: store,        child: new HomePage(title: 'Weight Tracker'),      ),    );  }}
Notice that we added middleware to the Store initialization. From now on, on every launch user will be signed in anonymously. It’s not much unless we will also connect to the database.
Syncing with Firebase Database
Don’t get discouraged if you don’t understand everything while reading. At the end I will explain it and all should be clear. 😉
At first, let’s add DatabaseReference to the state.
class ReduxState { final FirebaseUser firebaseUser; final DatabaseReference mainReference; final List<WeightEntry> entries; ...}Then we will add two new actions:
class AddDatabaseReferenceAction { final DatabaseReference databaseReference;
 AddDatabaseReferenceAction(this.databaseReference);}
class OnAddedAction {  final Event event;
  OnAddedAction(this.event);}
Next we need to update middleware
firebaseMiddleware(Store<ReduxState> store, action, NextDispatcher next) { if (action is InitAction) { ... } else if (action is AddEntryAction) { store.state.mainReference.push().set(action.weightEntry.toJson()); } next(action); if (action is UserLoadedAction) { store.dispatch(new AddDatabaseReferenceAction(FirebaseDatabase.instance .reference() .child(store.state.firebaseUser.uid) .child("entries") ..onChildAdded .listen((event) => store.dispatch(new OnAddedAction(event))))); }}And update reducer
ReduxState stateReducer(ReduxState state, action) {  if (action is AddDatabaseReferenceAction) {    return state.copyWith(mainReference: action.databaseReference);  } else if (action is OnAddedAction) {    return _onEntryAdded(state, action.event);  }  ...}
ReduxState _onEntryAdded(Event event) {  return new state.copyWith(     entries: <WeightEntry>[]       ..addAll(state.entries)       ..add(new WeightEntry.fromSnapshot(event.snapshot)));}
How does it work?
- First, we invoke InitAction, in the middleware, we obtain a FirebaseUser and invoke OnUserLoadedAction.
- After the user is updated, we create DatabaseReference and pass it in AddDatabaseReferenceAction.
- This reference has also added OnChildAdded listener which, when called, will invoke OnAddedAction.
- When that one gets passed, it adds an Entry to the state’s list (exactly how AddEntryAction worked before).
And when it comes to AddEntryAction, instead of adding an Entry to list, we simply call Database’s push method. Since now this action won’t even be handled in reducer, because it doesn’t affect the state at all.
If the process is still not clear for you, the following UML sequence diagram may be helpful to fully understand the flow:
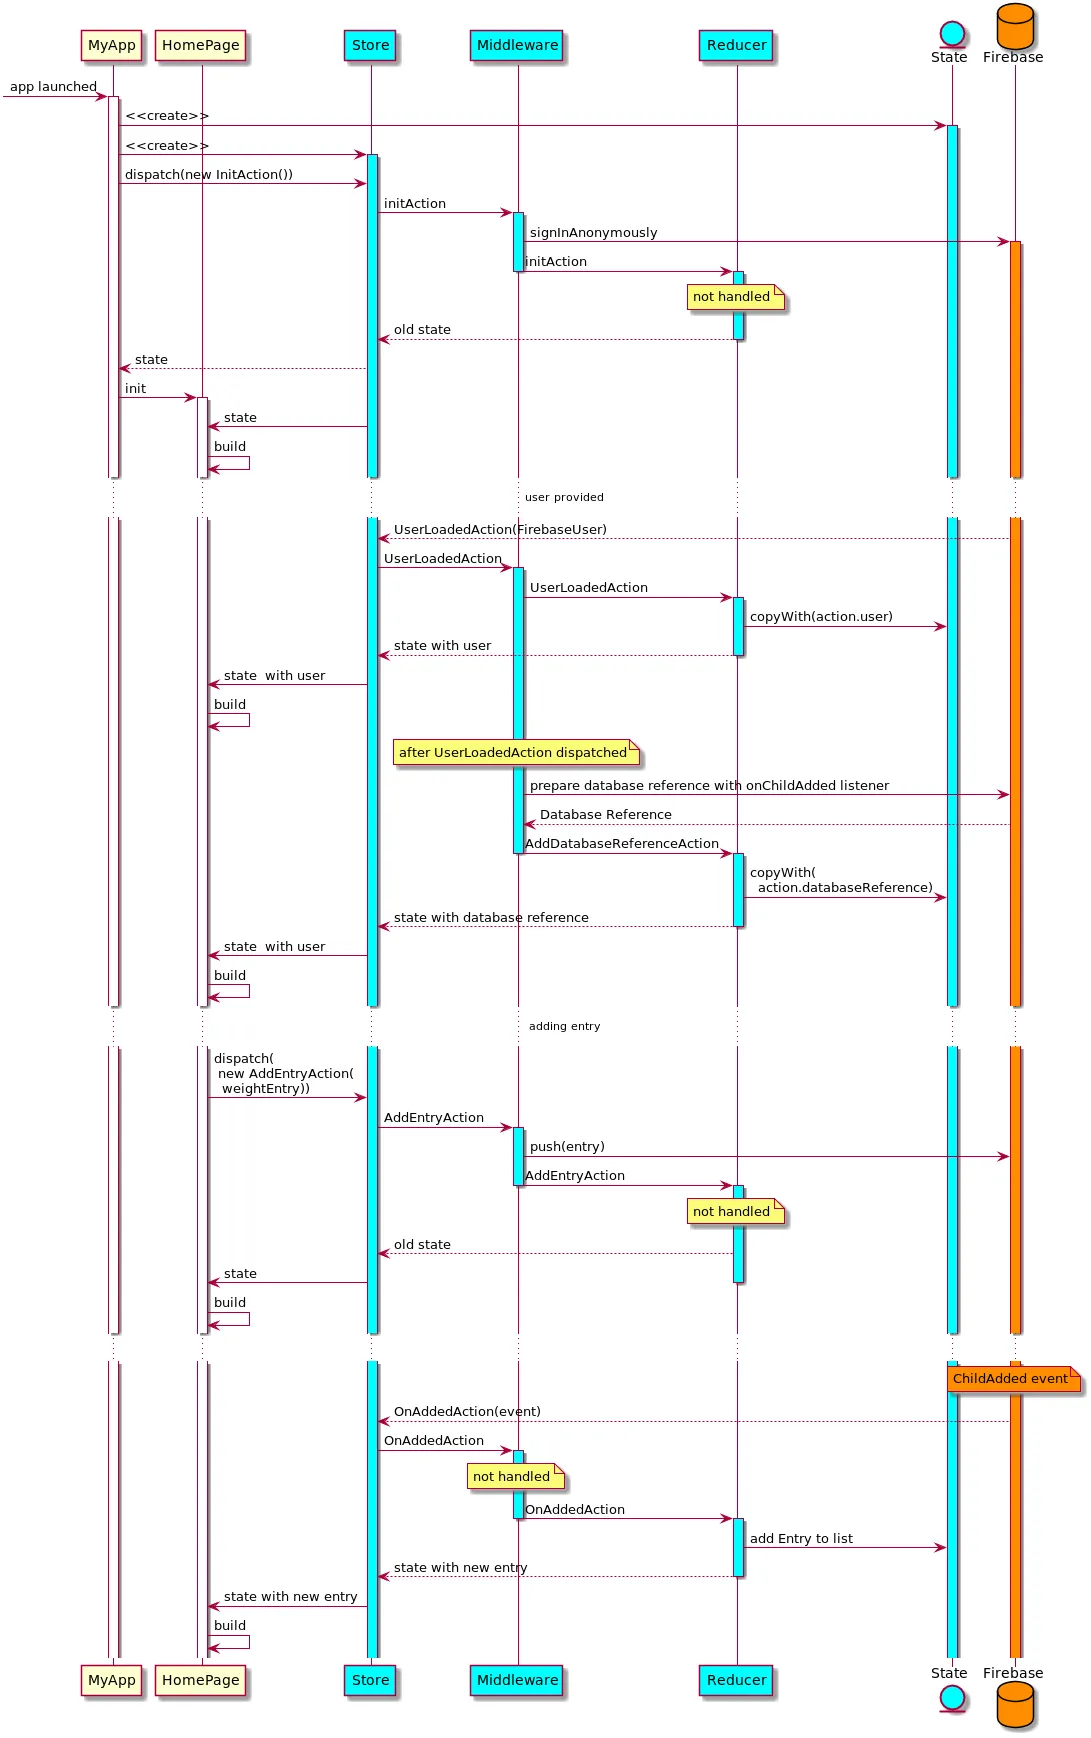
For better understanding I also recommend checking out whole source code (linked at the bottom).
Wrapping up
Now we have reduxed firebase app. I think that having screen Widgets with clearly defined data and actions they will use (in viewModel) and not having any logic in those widgets are very beneficial for code readability. I encourage you to try Reduxing your Flutter app, it really provides great control over the whole application. 🙂
That’s it! 🙂
You can find the full code here.
Special thanks to Brain Egan (@brianegan) for support 🙂